Inspection Playbook for Investment Properties: Deadlines, Negotiation, and Profit Protection
Learn about Inspection for real estate investing.
Why Inspections Are Your Leverage and Shield
When I help clients buy rentals, I treat the inspection as risk control first and negotiation second.
It protects cash, time, and your future tenant experience.
Inspections surface hidden defects and change how we underwrite the deal.
They also create leverage we can use—politely and in good faith—to improve terms or exit cleanly.
Local contracts vary, so lean on your agent and attorney.
Still, the investor rhythm is the same in every market.
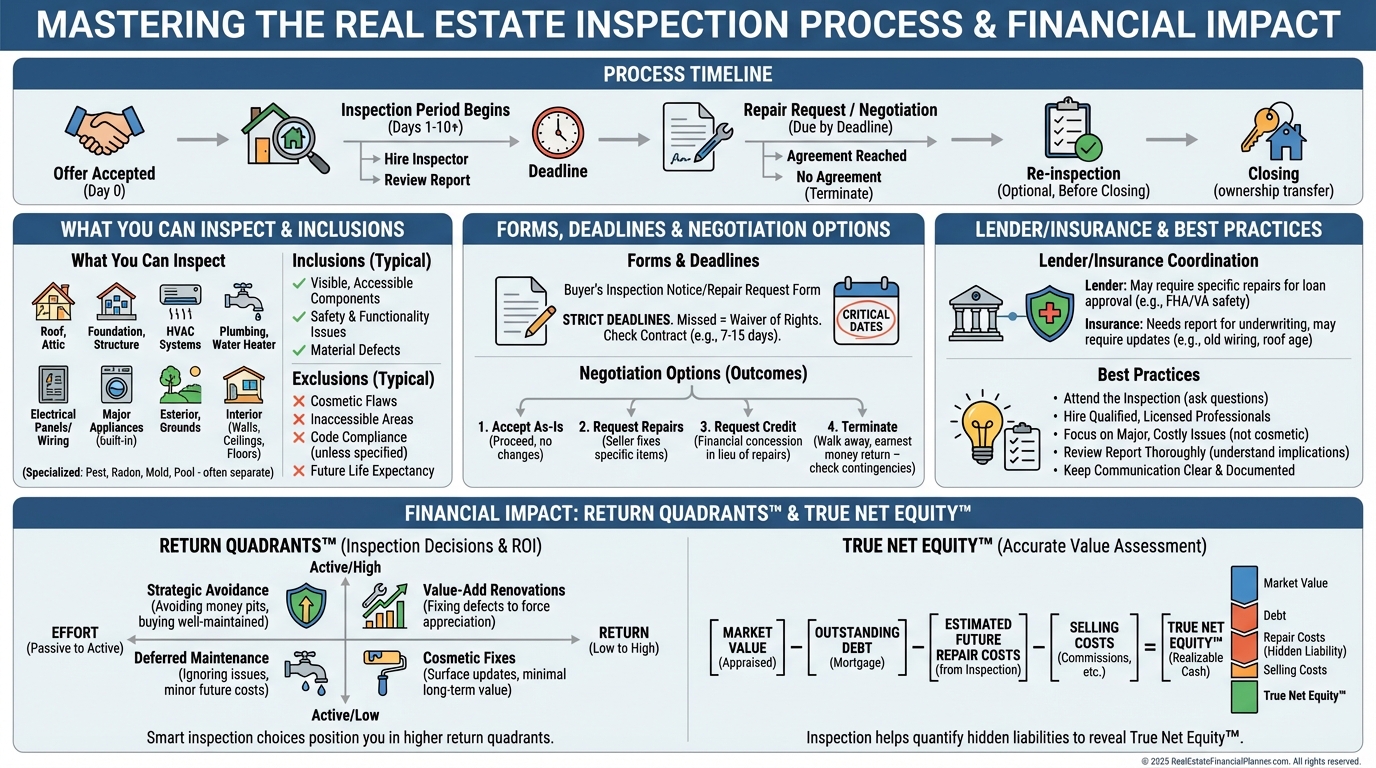
The Inspection Timeline I Coach Clients To Use
Your first “inspection” starts at the showing.
You scan for expensive problems and decide if the deal still pencils.
After acceptance, the formal inspection window opens.
You schedule a general inspection immediately and line up specialists as needed.
I review the report with clients the day it drops.
Then we choose: accept, object, or terminate before the deadline.
If we object, we negotiate a written resolution and plan re-inspections.
We also leave time for any required appraisal reinspections and underwriting updates.

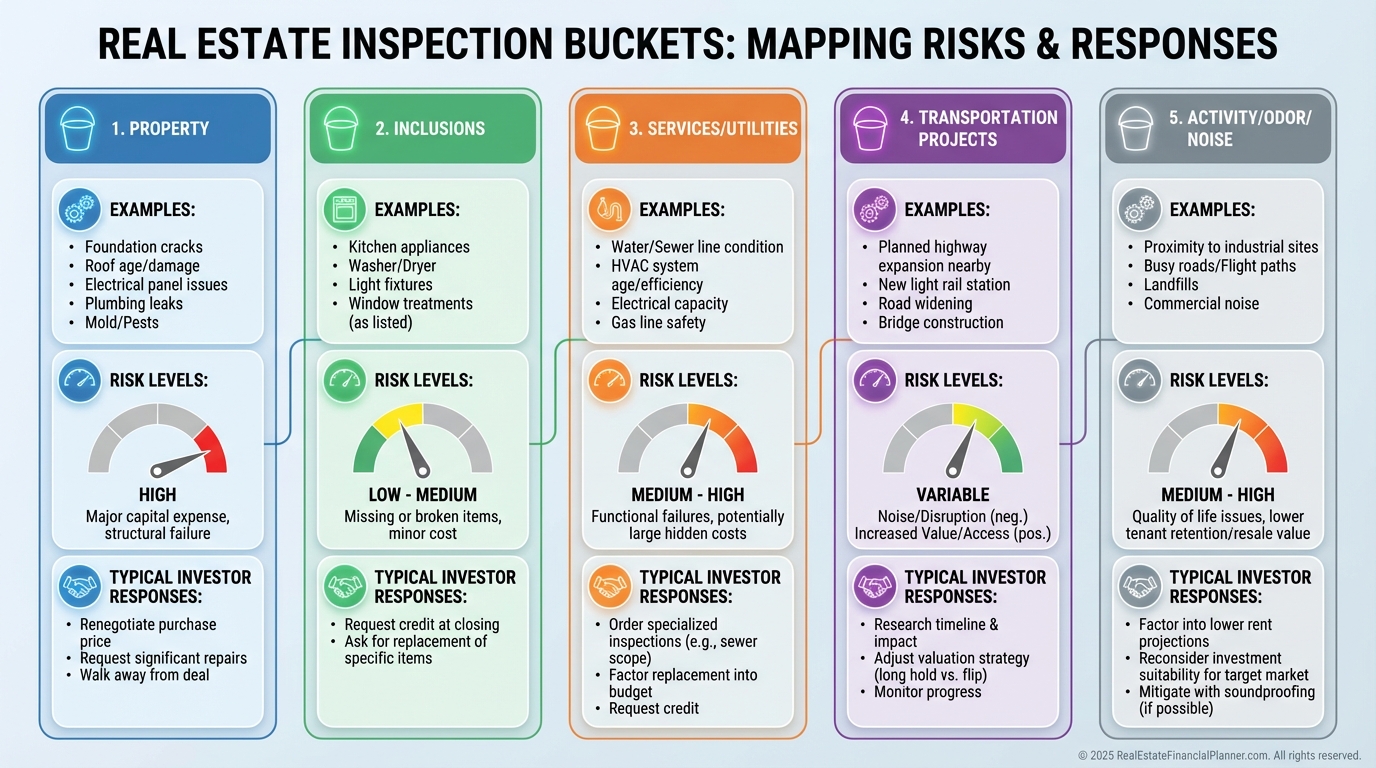
What You Can Inspect
Most investor contracts let you inspect five buckets.
1) Physical condition of the property.
2) Physical condition of the inclusions.
3) Services to the property.
4) Proposed or existing transportation projects.
5) Other activity, odor, or noise that affects value or livability.
I verify each bucket and document issues with photos, page numbers, and quotes.
If it changes occupancy, safety, or budget, it matters.
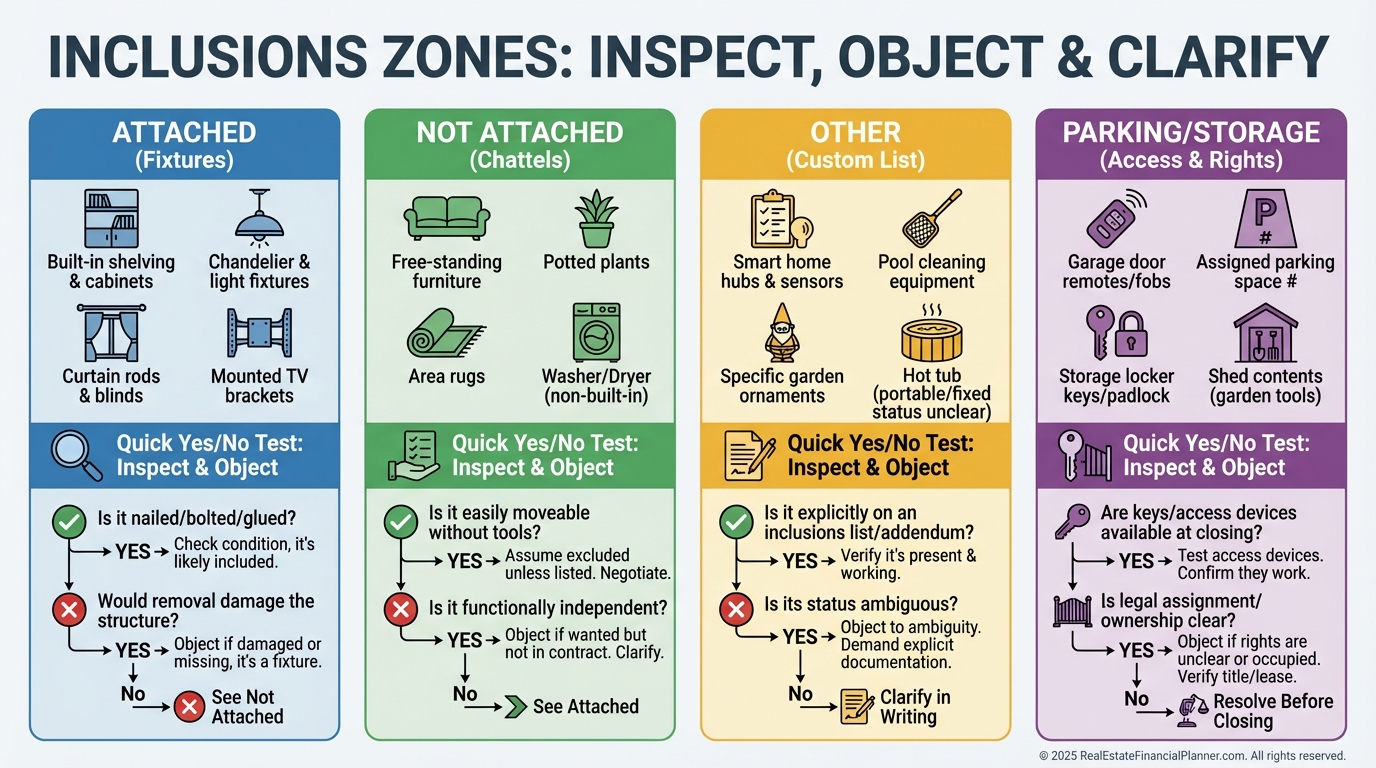
Inclusions That Trip Investors Up
Inclusions are part of your collateral and cash flow, so test them.
Attached inclusions could include HVAC, built-ins, wiring, sprinkler controllers, and garage remotes.
Not-attached inclusions might include blinds, window coverings, fireplace inserts, detectors, and keys.
Other inclusions are custom items you add to the contract like specific appliances.
Parking and storage spaces also count. Confirm use or ownership matches the contract.
Acting In Good Faith
I remind clients to negotiate what wasn’t obvious at the showing or what affects safety and function.
If you saw worn carpet before offering, don’t ambush the seller with it later.
But a failing panel, leaking roof, or unsafe deck is fair game.
Good faith preserves your reputation and keeps deals alive.
Your Three Choices After the Report
You can accept the property as-is.
You can object and request repairs or concessions.
You can terminate and preserve your earnest money if you’re within the terms and dates.
Each path is valid. We choose based on risk, time, and returns.
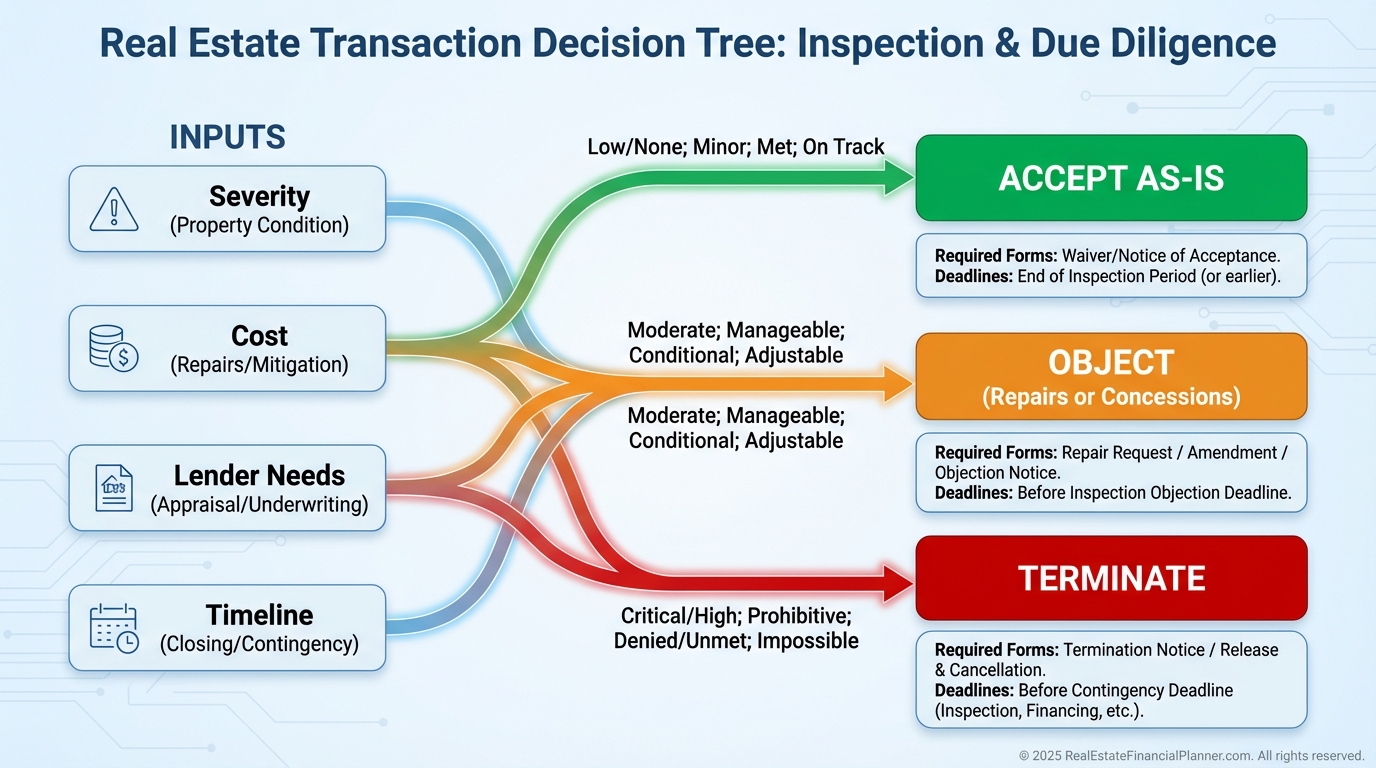
The Forms You’ll Actually Use
Objection Notice documents issues you want fixed or credited.
Inspection Resolution amends the contract with agreed repairs, credits, or price changes.
Notice to Terminate is your unilateral exit when allowed by contract.
The Earnest Money Release requires signatures to release funds.
Share material changes with your lender. Hiding them can be loan fraud.
If the appraiser must recheck repairs, build in time.
Who’s On Your Team
Buyer and agent drive timelines and strategy.
Seller and agent grant access and respond to objections.
Inspectors find issues and produce documentation.
Lender and appraiser care about safety, value, and collateral.
Insurance may fund covered losses, like roofs.
Contractors price, repair, and warrant work.
Title can offer OEC coverage to guard against mechanic’s liens.
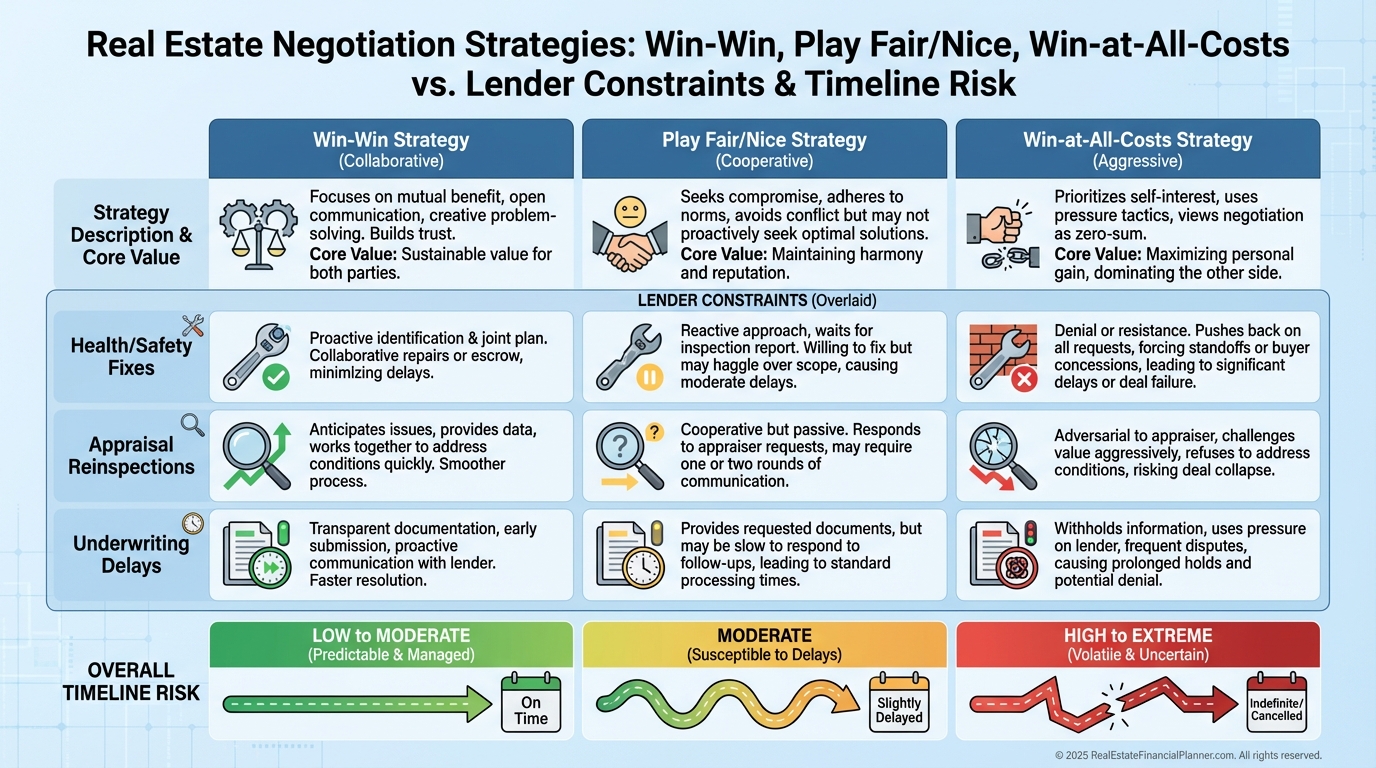
Negotiating Philosophies With Real Money Stakes
Win-Win: solve health and safety, share costs, protect closing dates.
Play Fair/Nice: ask for reasonable fixes or modest credits and keep momentum.
Win at All Costs: demand everything and risk the deal and relationships.
I tailor the approach to the market, leverage, and your priorities.
Always align with lender requirements and the appraisal calendar.
Objecting Like a Pro
Be specific. Reference report items, page numbers, and photos.
Ask for licensed and insured contractors.
Request receipts and transferable warranties.
Coordinate with your lender before you agree to repairs or credits.
Plan re-inspections and potential appraiser rechecks.
Common Objections I See Most
Loan-required fixes like roof leaks, inoperable heat, or unsafe electrical.
High-dollar surprises like structural movement, main sewer defects, or mold.
Included appliances that don’t work.
What’s uncommon are cosmetic nitpicks and ordinary wear.
Building the Resolution
Spell out exactly what is repaired, by whom, and by when.
Set standards for parts, permits, and workmanship.
Require documentation and re-inspection rights.
If repairs cannot finish by closing, include survival language or negotiate an escrow holdback when allowed.
Send the signed Resolution to your lender immediately.
Best Practices Checklist
I track dates with reminders and a backstop 24 hours early.
I schedule specialty inspections the same day the general is ordered.
I price repairs with two quotes when time allows.
I add re-inspection and documentation terms into the Resolution.
I consider Owner’s Extended Coverage from title to reduce lien risk.
I reserve time for the appraiser to revisit if needed.
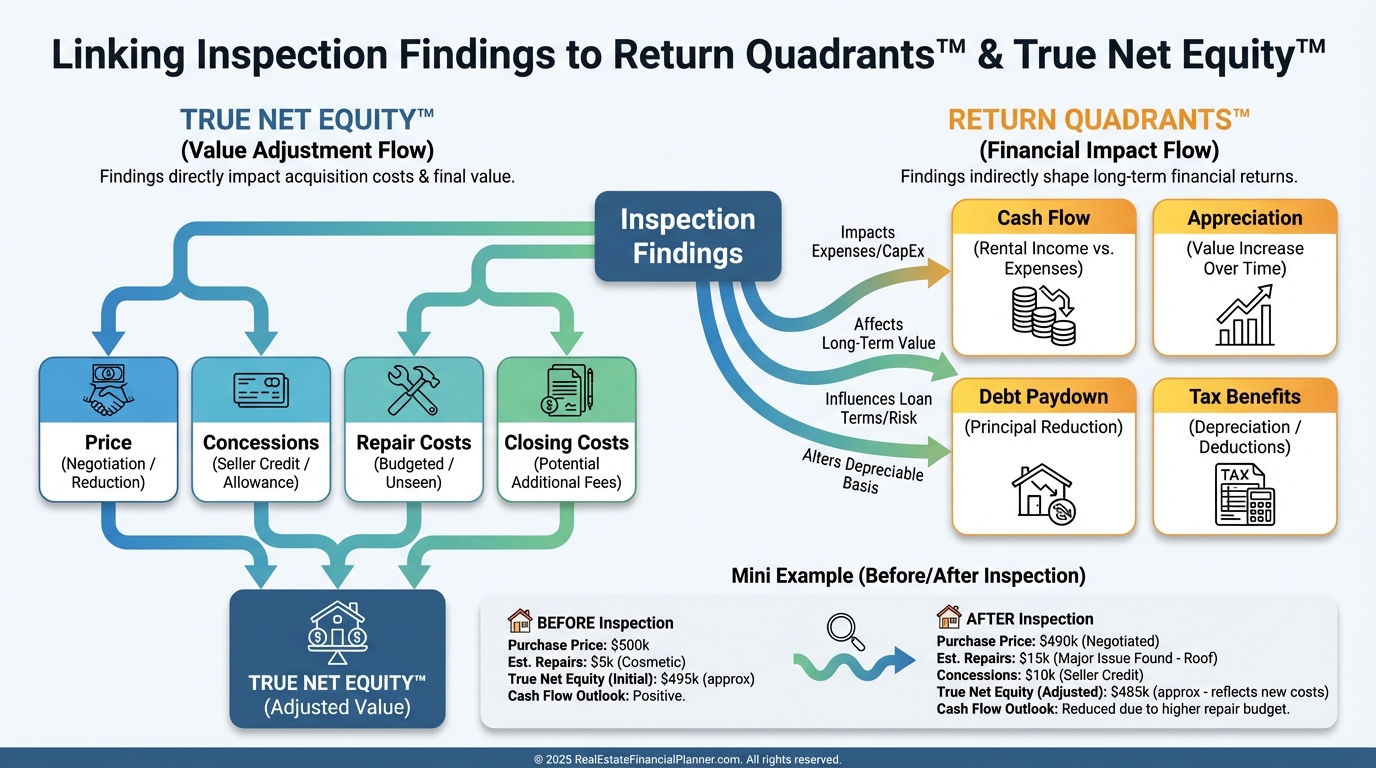
Financial Impact: Inspections and REFP Frameworks
Inspection outcomes change the math in the Return Quadrants™.
Credits or price drops change True Net Equity™ day one.
When Termination Is The Right Call
If an issue is a dealbreaker or the numbers fail, exit cleanly.
File the Notice to Terminate before the Objection Deadline per your contract.
Request the Earnest Money Release.
If there’s a dispute, consult counsel and follow the contract’s dispute path.
I’d rather lose a week than buy a lemon.
Final Coaching Notes
Act in good faith and document everything.
Protect deadlines like your down payment.
Use inspections to clarify risk, not to hope it away.
If the property still meets your criteria after corrections, move with confidence.
If not, terminate and redeploy capital into a better deal.